Comet-SFCC Integration Guide
Overview
The Comet cartridge is designed to streamline the process of retrieving data (Product, price books and inventory) from the Salesforce Commerce Cloud (SFCC) system in XML format. The cartridge uses out of the box export jobs which efficiently transfers the retrieved data to the Comet WEBDAV location by leveraging SFCC custom jobs, ensuring a smooth and automated data flow.
Supported Versions (Cartridge Compatibility)
The Comet cartridge is versatile and compatible with both SFRA and SiteGenesis shops. It has been thoroughly tested with SFRA 7.0 (SFCC 24.3) and offers support for versions as early as 6.3 (Compatibility mode of SFCC 22.7). This wide range of compatibility ensures that the cartridge can be seamlessly integrated into various SFCC environments.
Integration Video
We take pride in the exceptionally seamless integration process with Comet. Our team has worked diligently to ensure that the integration is not only swift but also incredibly straightforward. To showcase the ease of integration, we have prepared a video demonstration using SFRA. This video provides a clear visual representation of how effortlessly the Comet cartridge can be integrated into your SFCC system.
By watching the integration video, you can gain a comprehensive understanding of the steps involved and witness firsthand how smoothly the Comet cartridge integrates with SFCC. This video serves as a valuable resource for developers and stakeholders alike, providing them with the confidence to proceed with the integration process.
Available features
The Comet cartridge offers a comprehensive set of features to facilitate efficient data export from Salesforce Commerce Cloud (SFCC). These features include:
- Full & Delta Catalog export
- Full & Delta Inventory export
- Full & Delta PriceBooks export
- Full & Delta Campaign & Promotion export
- Headless stores (Comet Satellite Stores)
Dataflow diagrams

Integration Guide
Before you start
Access Preparations Access Setup on Comet Dashboard Before proceeding with the integration, it is essential to ensure that the necessary SFCC access is properly set up to facilitate the configuration of your account on the Comet portal.
Please follow these steps to complete the access setup:
1. Store details
Provide the store details: 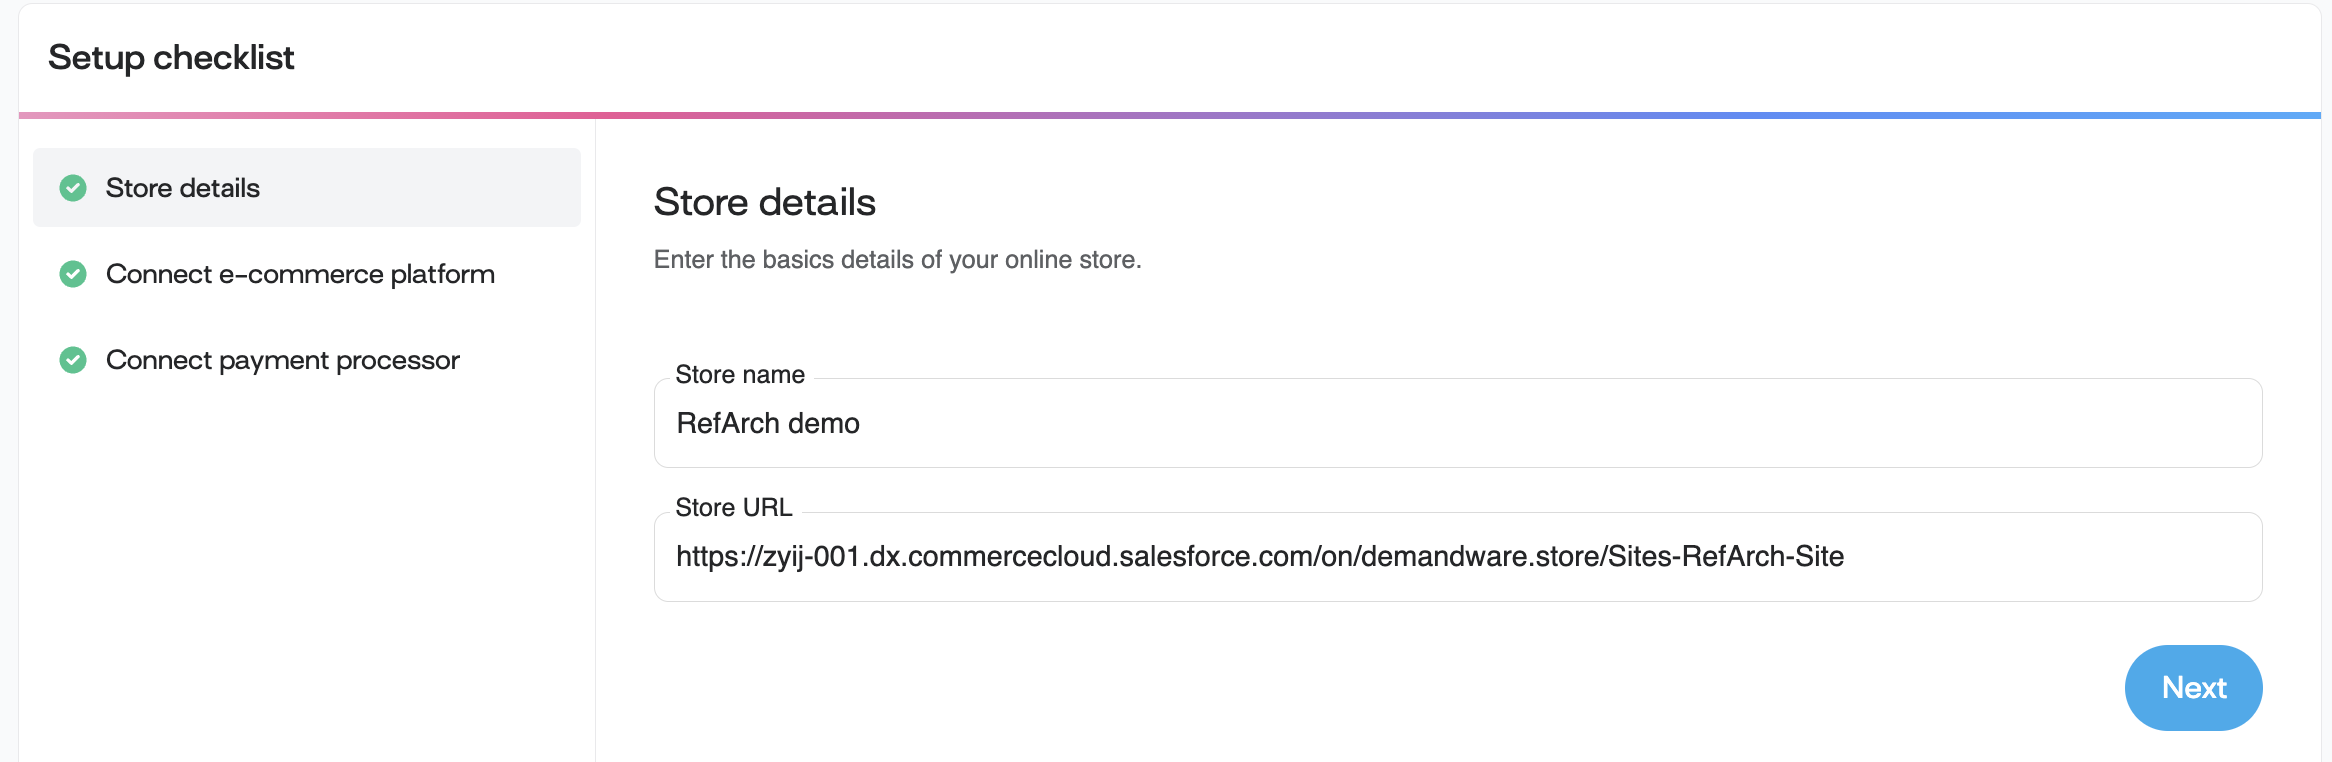
| Form Fields | meanings |
|---|---|
| Store Name: | Enter the name of your store as it should appear in the Comet system. This name will be used to identify your store throughout the integration process. |
| Storefront URL (Home page) | Provide the URL of your store’s home page. Please ensure that the Store Name and Storefront URL are accurate and properly formatted to avoid any connectivity issues during the integration process. ex: https://z**-001.dx.commercecloud.salesforce.com/on/demandware.store/Sites-RefArch-Site |
2. Select your e-commerce platform
Please choose your e-commerce platform from the following options: 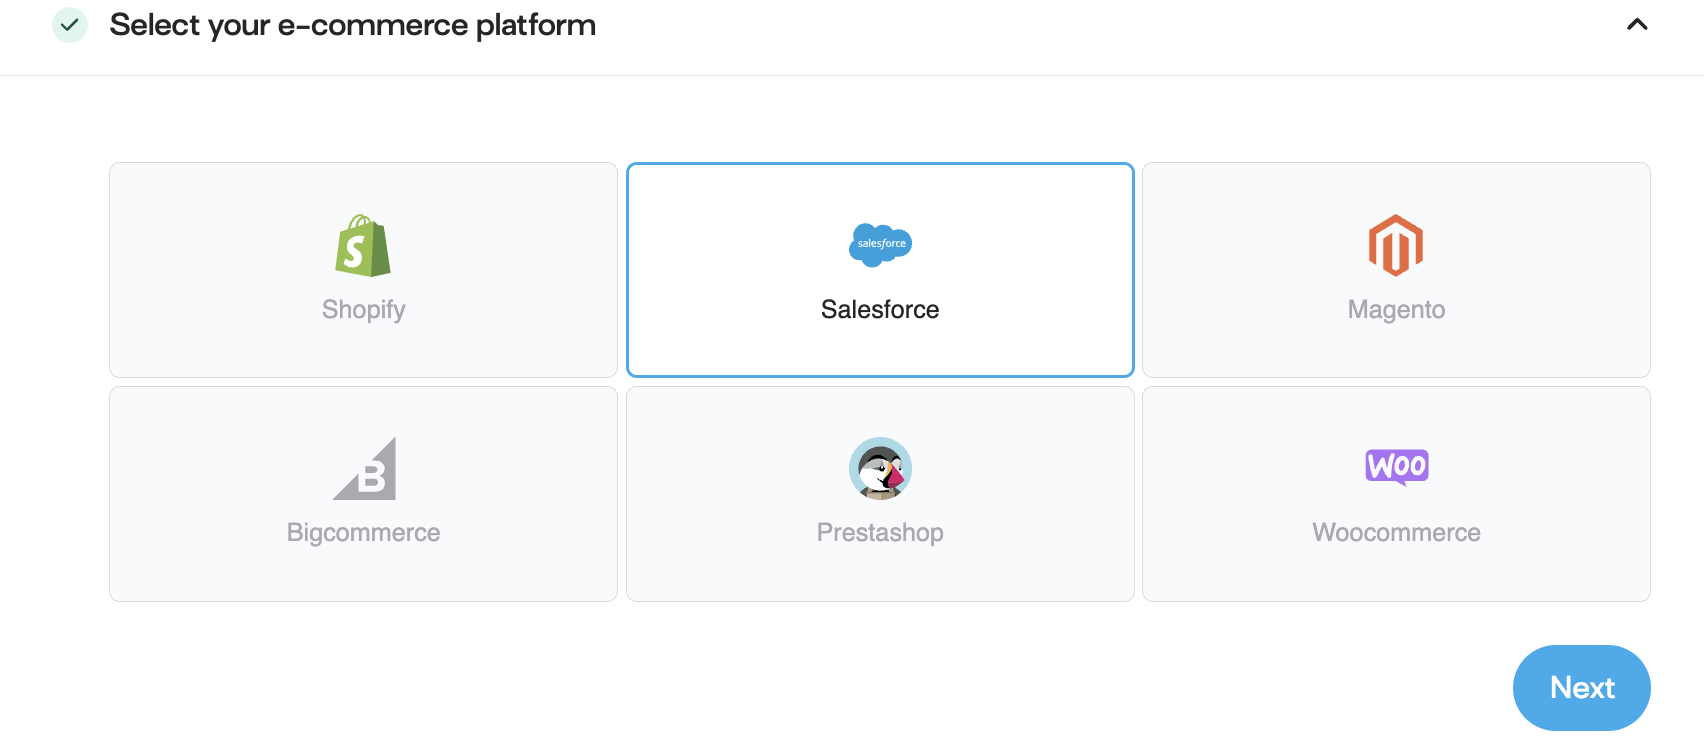
3. Configure catalog details
To configure the integration between Salesforce Commerce Cloud (SFCC) and the Comet 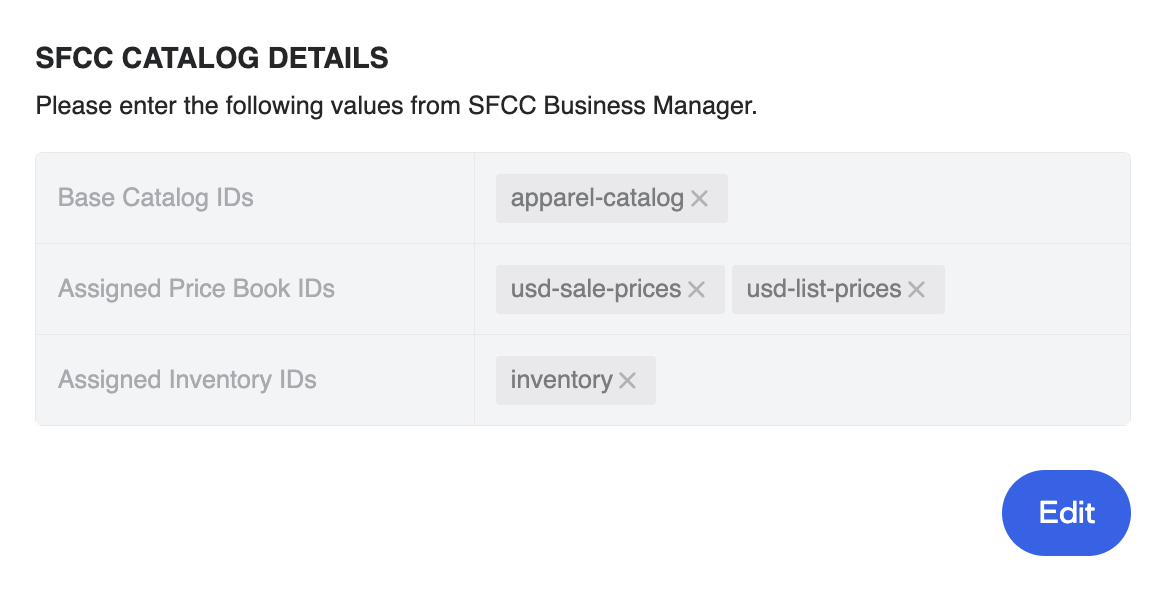
| Form Fields | meanings |
|---|---|
| Base Catalog ID | Enter the Base Catalog ID. Can be obtained from Business Manager > Merchant Tools > Products and Catalogs > Catalogs |
| Assigned Price Books IDs | Enter all the qualified price books belongs to the site. Can be obtained from Business Manager > Merchant Tools > Products and Catalogs > Price Books |
| Assigned Inventory IDs | Enter all the qualified inventories belongs to the site. Can be obtained from Business Manager > Merchant Tools > Products and Catalogs > Inventory |
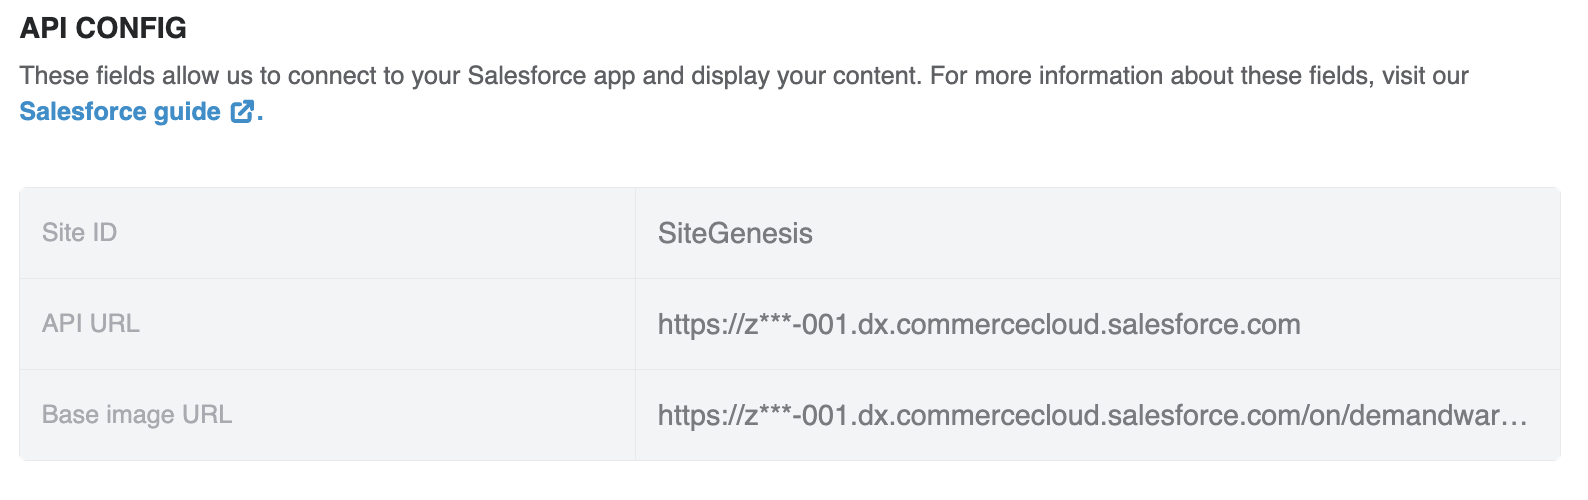
4. Submit API credentials
These fields allow us to connect to your Salesforce app and display your content. More information about these fields can be found below:
a. API Config
| Form Fields: | meanings |
|---|---|
| Site ID: | Enter site id from SFCC (ex: SiteGenesis, RefArch) |
| App URL: | Enter app sfcc sandbox domain (ex: https://z***-001.dx.commercecloud.salesforce.com) |
| Base Image URL: | Enter product image URL from sfcc sandbox with protocol. |
Please follow these steps to get the "Base Image URL"
- Go to any PDP page in your sandbox's storefront
- Copy the image url and remove everything after /images/.
- for ex : This is site Genesis image URL
https://*z****-001.dx.commercecloud.salesforce.com/on/demandware.static/-/Sites-apparel-catalog/default/dw2d53288c/images/large/PG.10235094.JJ2DHXX.PZ.jpg
The "Base Image URL" will be this for above URL
https://*z****-001.dx.commercecloud.salesforce.com/on/demandware.static/-/Sites-apparel-catalog/default/dw2d53288c/images/
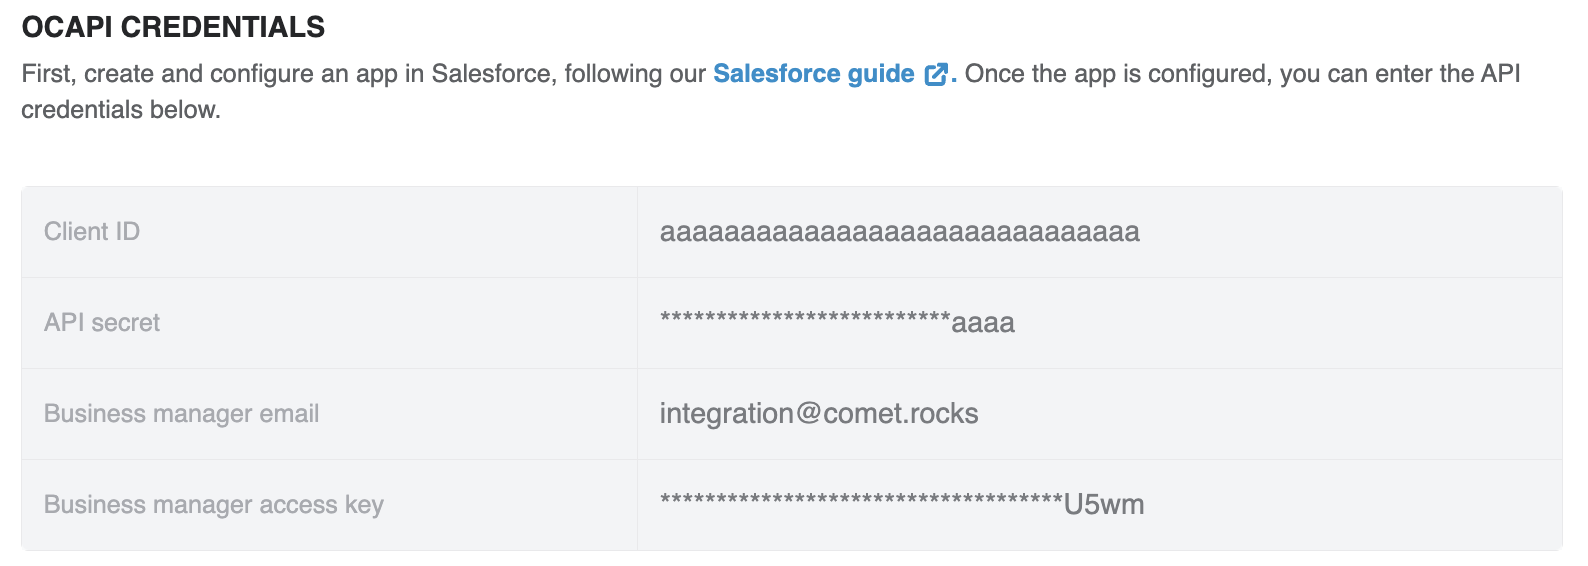
b. OCAPI credentials
| Form fields | meanings |
|---|---|
| Client ID: | Enter the unique identifier for your Salesforce Commerce Cloud account. This can be found in the account manager settings under the “API Client” section |
| API Secret: | Provide the API secret associated with your above Client ID. This secret is used to authenticate your integration and should be kept confidential. You can generate a new API Client and secret in your Salesforce Commerce Cloud account manager settings. |
| Business Manager email: | Enter the email address associated with your Salesforce Commerce Cloud Business Manager account. This email will be used for communication (ex:trigger Comet jobs from Comet console) related to the integration. |
| Business Manager access key: | Provide the access key for your Business Manager account. This key grants access to the necessary APIs and resources required for the integration. You can generate a new access key in your Business Manager > Profile > Manage Access Keys > Agent User Login and OCAPI |
c. SCAPI credentials
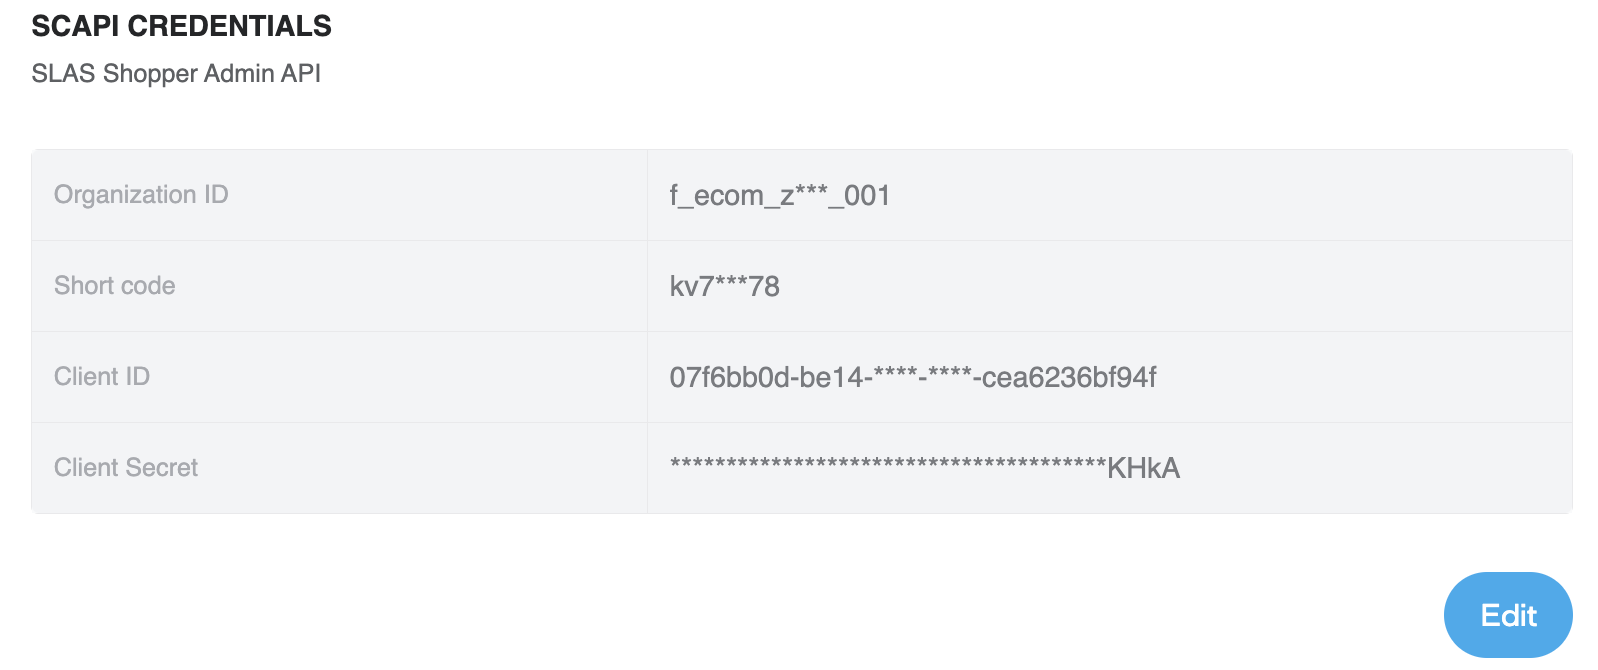 The following input fields are required for the Salesforce Commerce Cloud API (SCAPI) integration:
| Form fields | meanings |
|---|---|
| Organization ID | The unique identifier for your Salesforce Commerce Cloud organization. This can be found in the Administration > Site Development > Salesforce Commerce API Settings section. Ex: f_ecom_z***_001 |
| Short Code | A unique code that identifies your Salesforce Commerce Cloud instance. It is typically a combination of alphabets and a numeric identifier. Ex: k*7**m78 |
| Client ID | The client ID is used to authenticate your API requests. You can generate a client ID in your SLAS account using this document. Please choose "default shopper scopes" while creating the API clientInformation. |
| Client Secret | The client secret is a confidential key used to authenticate your API requests along with the client ID. It should be kept secure and never shared publicly. You can generate a client secret in the Account Manager under the "API Access" section. |
4. Add these credentials to Business Manager
Navigate to Merchant Tools > Site Preferences > Custom Site Preference > Comet Configurations and then paste the following values. 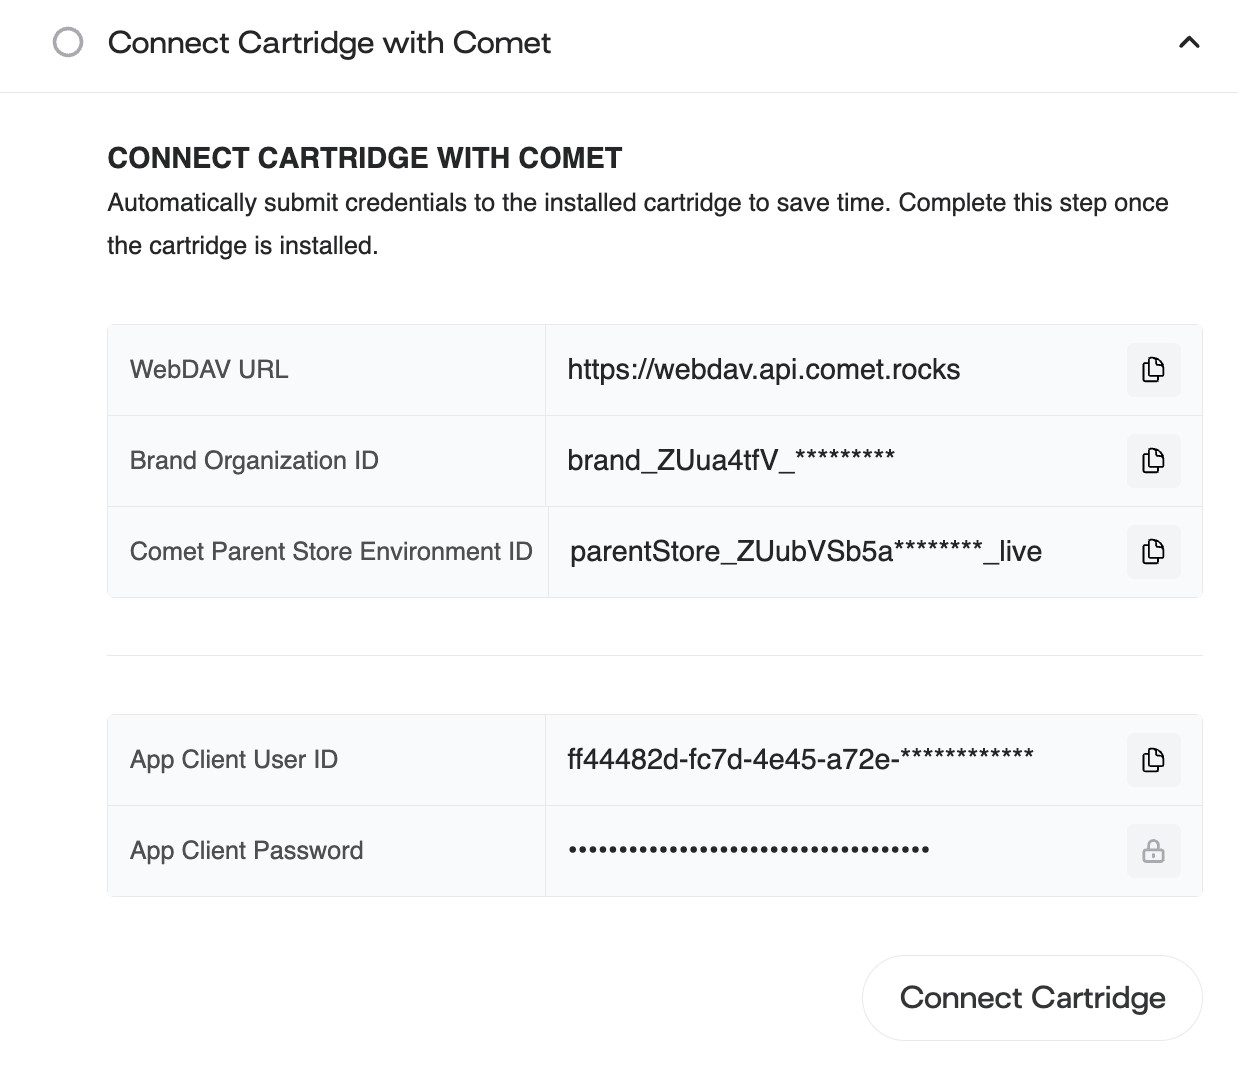
Fields WebDAV URL, Brand Organization ID and Comet Parent Store ID will be automatically generated and prefilled. Click on "Connect Cartridge", these credentials will be pushed to SFCC under Comet custom preference.
| Form Fields | meanings |
|---|---|
| WebDAV URL | This is the URL of Comet drop location where SFCC jobs will drop the exported FileSystem. |
| Brand Organization ID | Brand Organization ID will be created when a brand signup in Comet console. |
| Comet Parent Store Environment ID | Parent Store Environment ID will be created when a brand signup in Comet console. |
| App Client User ID | Generate Client User ID and store it in SFCC's Comet Custom preference |
| App Client Password | Generate Client Password and store it in SFCC's Comet Custom preference |
6. Connect payment processor
To enable secure and seamless payment transactions from comet satellite store, you need to integrate a payment processor. Please choose your favourite PSP out of given list. 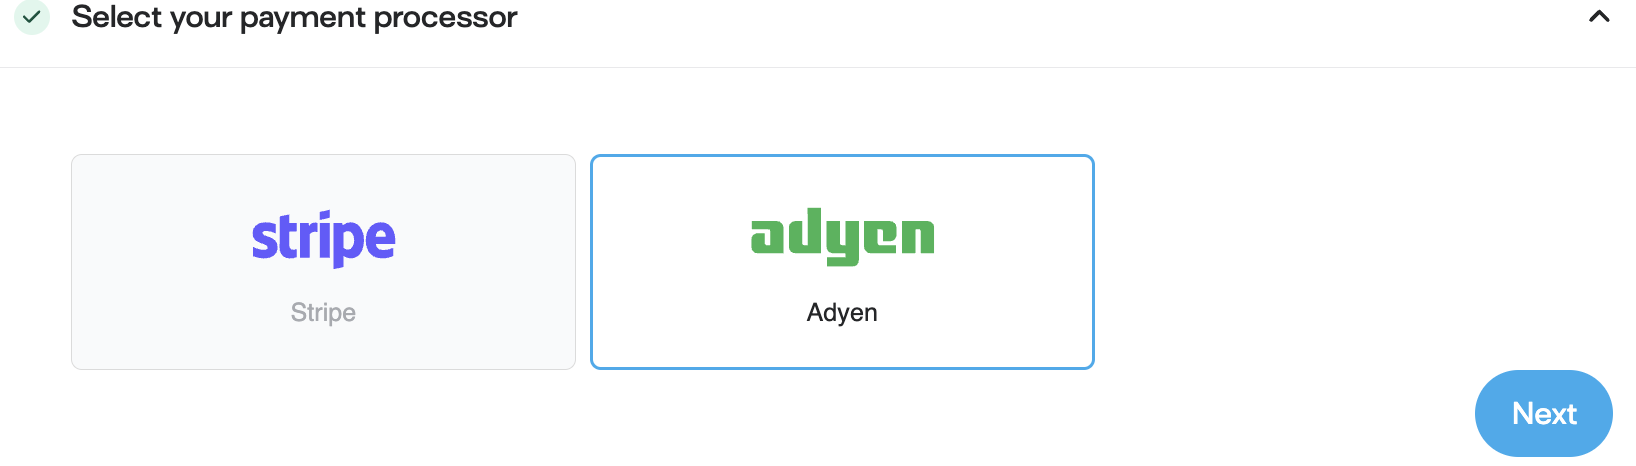
Follow these steps to connect your chosen payment processor: (Adyen's example below) Submit credentials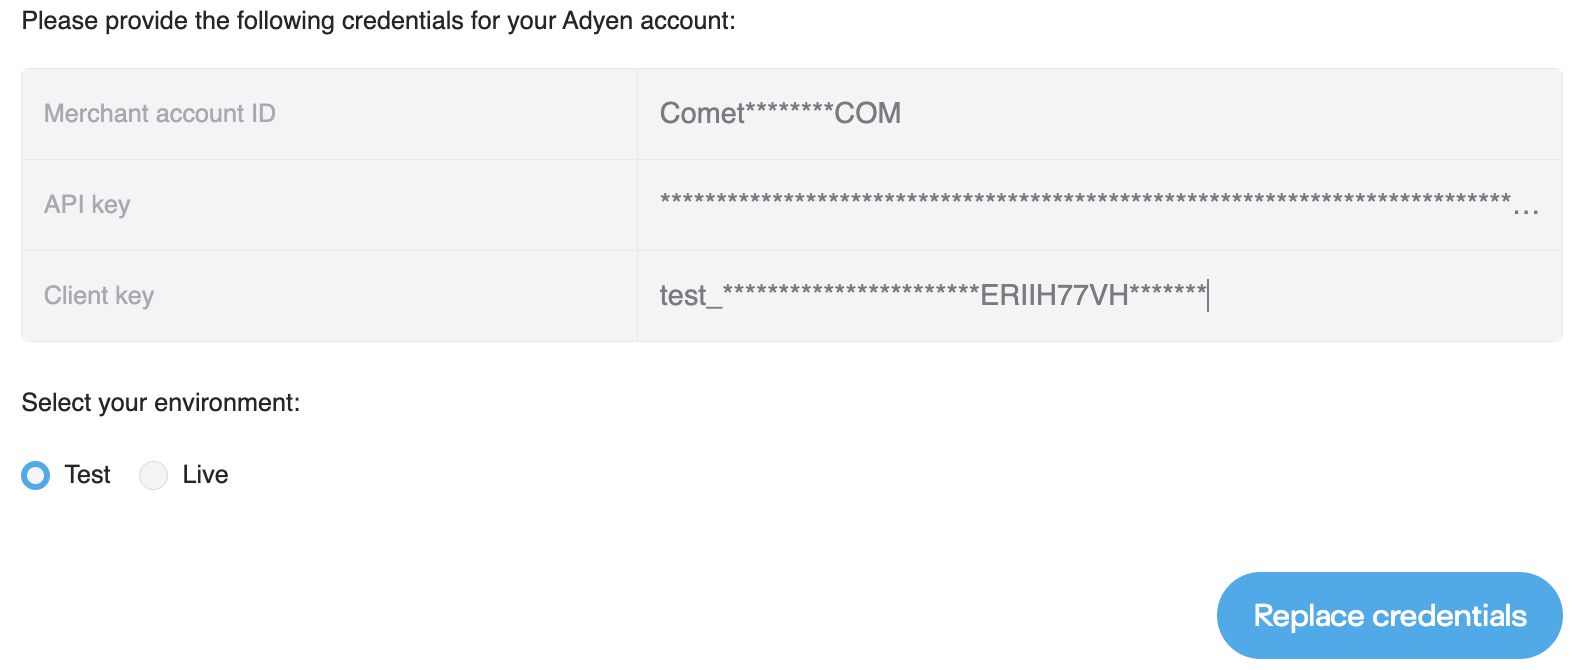
| Form fields | meanings |
|---|---|
| Merchant account ID | Enter your adyen's merchant account ID. You can get the merchant ID after logging into this link |
| API Key | A Adyen integration API key can be generated from the Adyen link |
| Client Key | Generate a client key as well from "Client settings" while generating API key in above step |
| Select your environment | Select "Test" OR "Live" based on the use case. |
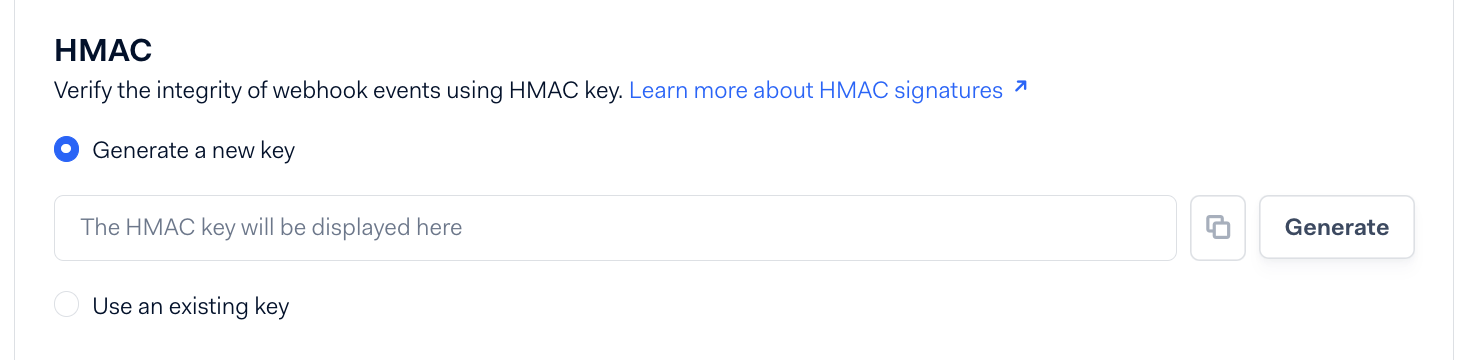
Configure Adyen Webhook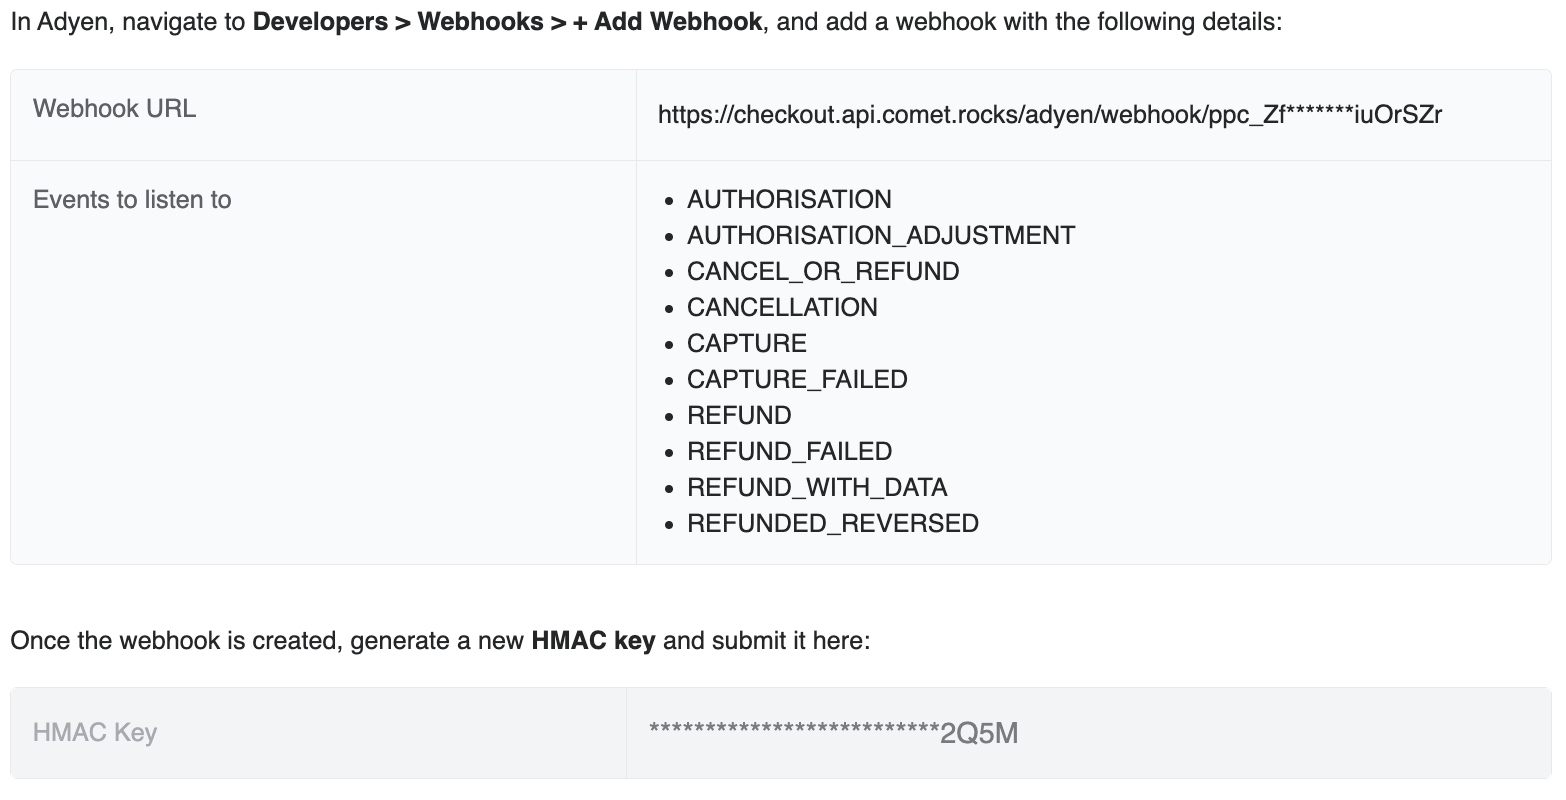
| Form fields | meanings |
|---|---|
| Webhook URL | The Webhook URL is the endpoint where Adyen will send the event data when the specified event occurs. This will be prefilled and not editable field. |
| Event to listen to | These are the recommended events that you want to subscribe to and receive notifications for. We have to select these events in Adyen portal while setting up the webhooks. |
| HMAC Key | The HMAC (Hash-based Message Authentication Code) key is a shared secret key used to authenticate and validate the integrity of the webhook messages sent from Adyen to your endpoint |
Note: Add https://satellites.comet.rocks into "Add allowed origins" while generating API key in above step.
7. Configure Adyen Webhook
Create a Webhook on Adyen Portal
To set up a webhook on the Adyen portal, follow these steps:
Log in to your Adyen account and navigate in the left sidebar.
Click on Webhooks under the Developers category.
Click on the Add webhook button to create a new webhook.
Choose the Standard webhook from the Recommended webhook section.

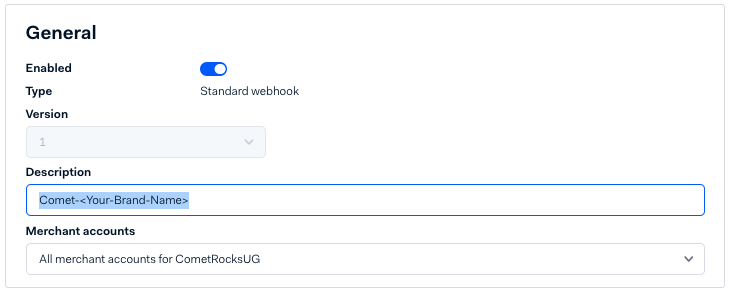
Provide the following details for your webhook:
- Description: Enter a descriptive name for your webhook. ex: "Comet-your_Brand_name"
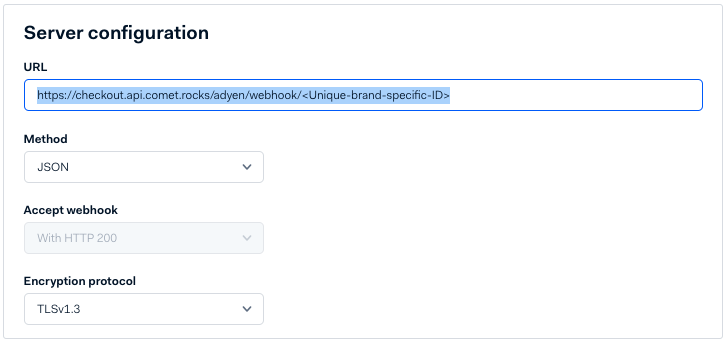
- URL: Specify the URL where Adyen should send the webhook notifications. Please copy the value from here.
- Method: Select JSON the method for the webhook requests.
- Authentication: If required, select the authentication method and provide the necessary credentials.
- Generate HMAC Key: Generate HMAC Key and add it in the Comet console.
In the Subscriptions section, select the events you want to receive notifications for. Please see the comet recommendation here.
Review your webhook configuration and click on the Save button to create the webhook.
Adyen will now send notifications to the specified URL whenever the selected events occur.
Note
Make sure your Salesforce Commerce Cloud integration is set up to handle the incoming webhook notifications from Adyen. You may need to configure the necessary endpoints and logic to process the received data.
Integration Steps
Adding the cartridge into the workspace
To upload the cartridges into the SFCC server, you first need to add the cartridges in your IDE (Code workspace).
Step 1: Set up the cartridge path
Before the Comet functionality can become available, the cartridge needs to be added to the cartridge path of the BM. In order to do this, follow the following instructions: 1. Log into Business Manager. 2. Navigate to Administration > Sites > Manage Sites. 3. Go to 'Manage the Business Manager site'.
Job Cartridge: bc_comet (To export catalog and order) 1. In the Cartridges input field add ‘bc_comet’. 2. Click on the 'Apply' button.
Storefront cartridge: 1. Navigate to Administration > Sites > Manage Sites. 2. Select you site (ex: Administration > Sites > Manage Sites > [Your Site ID] – Settings 3. Add the cartridge name ‘int_comet_core’ in the front of the path.
Step 2: Importing Metadata
To enable the Comet integration, the following object structures (metadata) must be imported and configured in the Business Manager:
Important: If Adyen is already integrated in the SFCC site, then please skip the Adyen-specific metadata included in the provided metadata.
- Locate the
metadata/comet-meta-importfolder within the cartridge bundle. - Inside the
metadatafolder, compress thecomet-meta-importfolder to generate acomet-meta-import.zipfile. - Navigate to Business Manager Menu > Administration > Site Development > Site Import & Export.
- Under the Import: Upload Archive section, ensure that the radio button labeled "Local" is enabled. If not, click on the radio button to enable it.
- Click on the Choose File input field and select the
comet-meta-import.zipfile from the open dialog box. - Click on the Upload button to initiate the upload process.
- Once the upload is complete, locate the
comet-meta-import.zipfile in the Archives list. - Click on the radio button corresponding to
comet-meta-import.zipand then click on the Import button. - A confirmation box will appear, asking, "Are you sure that you want to import the selected archive?" Click on the OK button to proceed.
- Please provide the Comet WebDAV server credentials and OCAPI
client_id.
Note: Currently, Comet utilizes OCAPI and SCAPI endpoints in the checkout flow. However, we plan to switch to completly SCAPI in our next release.
Used OCAPI endpoints
| OCAPI | Scope/Permissions | API Path | Purpose |
|---|---|---|---|
| Customer API | read_attributes, write_attributes | POST /customers/auth | Create shopper Token |
| Basket API | read_attributes, write_attributes | POST /baskets | Create basket |
| read_attributes, write_attributes | POST baskets/{basketId}/items | Add products | |
| read_attributes, write_attributes | DELETE baskets/{basket_id}/items/{item_id} | Remove item from basket | |
| read_attributes, write_attributes | PATCH baskets/{basket_id}/items/{item_id} | Update item quantity in the basket | |
| read_attributes, write_attributes | DELETE /baskets/{basketId} | Delete the basket | |
| read_attributes, write_attributes | POST /baskets/{basketId}/billing_address | Add Billing address | |
| read_attributes, write_attributes | PUT /baskets/{basket_id}/customer | Add Shopper email to the basket | |
| read_attributes, write_attributes | PUT /baskets/{basketId}/shipments/shipping_address) | Adding shipping address | |
| read_attributes, write_attributes | POST /baskets/{basket_id}/coupons | Update basket with coupon | |
| read_attributes, write_attributes | GET /baskets/{basket_id}/approaching_discounts | Get approaching discounts of a basket | |
| read_attributes, write_attributes | DELETE /baskets/{basket_id}/coupons/{coupon_item_id} | Delete basket coupon | |
| read_attributes, write_attributes | GET /baskets/*/payment_methods | Get payment methods | |
| read_attributes, write_attributes | POST /baskets/{basket_id}/payment_instruments | Set Payment method and payment details | |
| Order API | read_attributes, write_attributes | POST /orders | Create Order |
| read_attributes, write_attributes | PATCH /orders/{order_no}/payment_instruments/{payment_instrument_id} | Updates payment instrument of order | |
| read_attributes, write_attributes | PATCH /orders/{order_no} | Confirm Order | |
| Data API | |||
| Jobs API | read_attributes, write_attributes | POST /jobs/*/executions | Execute the jobs |
| read_attributes, write_attributes | POST /job_execution_search | Search job |
Step 3: Update custom preference
In Business Manager, navigate to Merchant ToolsSite > Preferences Custom > Site Preference Groups. Custom preference groups with the ID “Comet Configuration” are available. 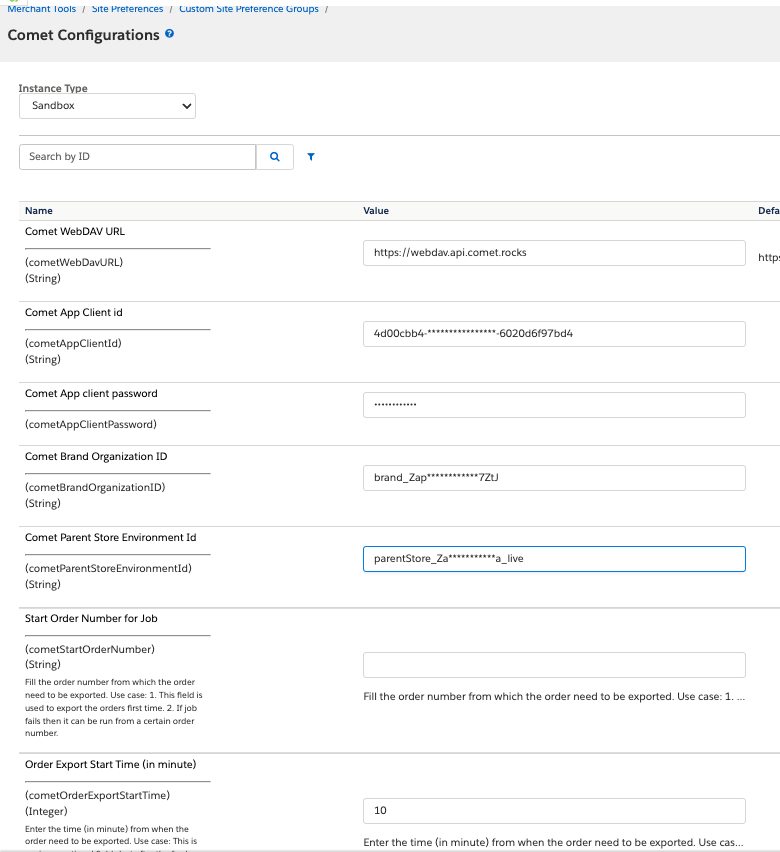
| Comet Attributes | Purpose |
|---|---|
| Comet WebDAV URL | The Comet WebDAV URL is the endpoint provided by the Comet system for accessing and dropping files using the WebDAV protocol. The URL can be obtained on this step |
| Comet App Client id | The Comet App Client ID is a unique identifier assigned to the client application that is authorized to access the Comet system. This will be generated on this step |
| Comet App client password | The Comet App Client Password is the corresponding password associated with the Comet App Client ID. This will be generated on this step |
| Comet Brand Organization ID | The Comet Brand Organization ID represents the specific organization or brand within the Comet system that the integration is associated with. The ID can be obtained on this step |
| Comet Parent Store Environment Id | The Comet Parent Store Environment ID identifies the specific environment within the Salesforce Commerce Cloud where the integration is being set up. It helps in distinguishing between different environments, such as development, staging, or production OR Site A, Site B ..etc, and ensures that the integration is configured correctly for the intended environment.The ID can be obtained on this step |
| Start Order Number for Job | The Start Order Number for Job field is used to specify the order number from which the order export process should begin. This field is particularly useful in two scenarios: 1. When exporting orders for the first time, you can set the starting order number to ensure that all relevant orders are included in the export. 2. If a previous job fails, you can use this field to resume the export process from a specific order number, avoiding the need to start from the beginning. |
| Order Export Start Time (in minute) | The Order Export Start Time field allows you to specify the time, in minutes, from when the orders should be exported. This field is optional and provides an alternative way to determine the starting point for order export. It is useful in scenarios where you want to export orders based on a specific time frame rather than an order number. For example: - If you enter 1440 minutes, the system will export orders from one day before the current time. - If you enter 10080 minutes, the system will export orders from 7 days before the current time. Note: Either the Start Order Number or the Order Export Start Time should be provided to determine the starting point for order export. |
Step 4: Configure the jobs
- Please follow the instructions and configure the jobs.
- Delta jobs: The Comet cartridge utilizes SFCC's default delta jobs. Ensure that the delta job feature is activated in the sandbox or instance where it is being employed. If not enabled, please reach out to SFCC support. If you are able to see this "Delta Exports" options at Administration > Site Development > Delta Exports, then its already enabled. Then, follow the instructions
Note: The integration has been completed.
Integration Jobs Overview
The integration cartridge mostly uses SFCC's out of the box jobs to export full and delta data. Comet requires the following SFCC catalog data for integration:
- Base catalog
- Storefront catalog
- Inventory data
- Pricebook data
Navigate to Administration > Operations > Jobs, after successful metadata import a list of jobs with ‘Comet’ as prefix can be seen. The Comet cartridge provides two types of jobs to export SFCC catalog data and send it to the Comet WebDAV. Merchants can choose the job type that best suits their requirements and integration preferences.
Single Job
Alternatively, merchants can opt for a single job that encompasses all the necessary data exports. This job can be scheduled and executed as a single entity, simplifying the process for merchants who prefer a more streamlined approach.
Multiple Jobs
In this approach, separate jobs are available for each component:
- Base catalog job
- Storefront catalog job
- Inventory data job
- Pricebook data job
Each job can be scheduled and executed independently, allowing for more granular control over the data export process.
Single Job Setup
1. COMET-All-Full-Export-Job
This job is responsible for exporting all the necessary data from Salesforce Commerce Cloud (SFCC) and delivering the XML files to the designated Comet drop location.
Base catalog export job
- Step Job for Base Catalog
- Comet-Full-Catalog-Export-Base
- Configuration:
- Enter the base catalog ID that needs to be exported. Ex: electronics-catalog
- Export File:
Comet/Catalogs/Full-Export/comet-full-cat-export-base
- Configuration:
- Comet-Full-CatalogExport-Compress-Base
- Configuration:
- Select the site for which the integration has been done.
- Comet-Full-CatalogExport-UploadToComet-Base
- Configuration:
- Comet-Full-Catalog-Export-Base
- Step Job for Storefront Catalog
- Comet-Full-Catalog-Export-Storefront
- Configuration:
- Enter the base catalog ID that needs to be exported. Ex: storefront-catalog-en
- Export File:
Comet/Catalogs/Full-Export/comet-full-cat-export-storefront
- Configuration:
- Comet-Full-CatalogExport-Compress-Storefront
- Configuration: Select the site for which the integration has been done.
- Comet-Full-CatalogExport-UploadToComet-Storefront
- Comet-Full-Catalog-Export-Storefront
- Step Job for Site Preferences
- Job to provide SitePreferences which are assigned to the site.
- Comet-Export-Site-Preferences
- Configuration: Select the site for which the integration has been done.
- Export File:
Comet/Catalogs/SitePreferences/site-preferences
- Export File:
- Configuration: Select the site for which the integration has been done.
- Comet-Site-Export-Filter-SitePreferences
- Configuration: Select the site for which the integration has been done.
- Export File:
Comet/Catalogs/SitePreferences/site-preferences - Include these preferences:
SitePriceBooks, SiteInventoryList
- Export File:
- Configuration: Select the site for which the integration has been done.
- Comet-Site-Export-Upload-SitePreferences
- Step Job for Price Books
- Comet-Full-PriceBook-Export
- Configuration:
- Export File:
Comet/Catalogs/PriceBooks/Full-Export/comet-full-price-book - OverwriteExportFile flag should be set to true.
- DataUnits: Enter the pricebook Ids which required to be exported. Ex:
json{ "export_data_units_configuration": { "price_books": { "usd-sale-prices": true, "usd-list-prices": true } } } - Export File:
- Configuration:
- Comet-Full-PriceBook-Export-MoveTo-CometLocalDir : Moves the file into Comet local folder in SFCC.
- Configuration: Select the site for which the integration has been done.
- Comet-Full-PriceBook-Export-UploadToComet-WebDav : Transfer the file to Comet remote location.
- Comet-Full-PriceBook-Export
Note: Adding new promotional pricebooks:
- Go to jobID: COMET-All-Full-Export-Job, step job: Comet-Full-PriceBook-Export) include the new pricebook ID in field DataUnits.
- Enable delta export for that pricebook, Go to Administration > Site Development > Delta Exports and add new pricebook for delta job.
- Step Job for Inventory export
- Comet-Full-Inventory-Export
- Configuration:
- Export File:
Comet/Catalogs/Inventory/Full-Export/comet-full-inventory - OverwriteExportFile flag should be set to true.
- DataUnits: Enter the pricebook Ids which required to be exported. Ex:
json{ "export_data_units_configuration": { "price_books": { "inventory": true } } } - Export File:
- Configuration:
- Comet-Full-PriceBook-Export-MoveTo-CometLocalDir : Moves the file into Comet local folder in SFCC.
- Configuration: Select the site for which the integration has been done.
- Comet-Full-PriceBook-Export-UploadToComet-WebDav: Transfer the file to Comet remote location.
- Comet-Full-Inventory-Export
Multiple Jobs Setup
1. Full base catalog export job
- Step Job for Base Catalog
- Comet-Full-Catalog-Export-Base
- Configuration:
- Enter the base catalog ID that needs to be exported. Ex: electronics-catalog
- Export File:
Comet/Catalogs/Full-Export/comet-full-cat-export-base
- Configuration:
- Comet-Full-CatalogExport-Compress-Base
- Configuration:
- Select the site for which the integration has been done.
- Comet-Full-CatalogExport-UploadToComet-Base
- Configuration:
- Comet-Full-Catalog-Export-Base
2. Full storefront catalog export job
- Step Job for Storefront Catalog
- Comet-Full-Catalog-Export-Storefront
- Configuration:
- Enter the base catalog ID that needs to be exported. Ex: storefront-catalog-en
- Export File:
Comet/Catalogs/Full-Export/comet-full-cat-export-storefront
- Configuration:
- Comet-Full-CatalogExport-Compress-Storefront
- Configuration: Select the site for which the integration has been done.
- Comet-Full-CatalogExport-UploadToComet-Storefront
- Comet-Full-Catalog-Export-Storefront
3. Full pricebooks export job
- Step Job for Price Books
- Comet-Full-PriceBook-Export
- Configuration:
- Export File:
Comet/Catalogs/PriceBooks/Full-Export/comet-full-price-book - OverwriteExportFile flag should be set to true.
- DataUnits: Enter the pricebook Ids which required to be exported. Ex:
json{ "export_data_units_configuration": { "price_books": { "usd-sale-prices": true, "usd-list-prices": true } } } - Export File:
- Configuration:
- Comet-Full-PriceBook-Export-MoveTo-CometLocalDir : Moves the file into Comet local folder in SFCC.
- Configuration: Select the site for which the integration has been done.
- Comet-Full-PriceBook-Export-UploadToComet-WebDav : Transfer the file to Comet remote location.
- Comet-Full-PriceBook-Export
Note: Adding new promotional pricebooks:
- Go to jobID: COMET-All-Full-Export-Job, step job: Comet-Full-PriceBook-Export) include the new pricebook ID in field DataUnits.
- Enable delta export for that pricebook, Go to Administration > Site Development > Delta Exports and add new pricebook for delta job.
4. Full inventory export job
- Step Job for Inventory export
- Comet-Full-Inventory-Export
- Configuration:
- Export File:
Comet/Catalogs/Inventory/Full-Export/comet-full-inventory - OverwriteExportFile flag should be set to true.
- DataUnits: Enter the pricebook Ids which required to be exported. Ex:
json{ "export_data_units_configuration": { "price_books": { "inventory": true } } } - Export File:
- Configuration:
- Comet-Full-PriceBook-Export-MoveTo-CometLocalDir : Moves the file into Comet local folder in SFCC.
- Configuration: Select the site for which the integration has been done.
- Comet-Full-PriceBook-Export-UploadToComet-WebDav: Transfer the file to Comet remote location.
- Comet-Full-Inventory-Export
4. Full Campaign and Promotion export job
- Step Job for Campaign and Promotion export
- Comet-Full-Campaign-Promotion-Export
- Configuration:
- Export File:
Comet/Promotions/Full-Export/comet-full-promo - OverwriteExportFile flag should be set to true.
- Export File:
- Configuration:
- Comet-Full-CampPromo-Export-Compress-Base : Compress the generated file.
- Configuration: Select the site for which the integration has been done.
- Comet-Full-CampPromo-Export-UploadToComet-WebDav: Transfer the file to Comet remote location.
- Configuration: Select the site for which the integration has been done.
- Comet-Full-Campaign-Promotion-Export
Common Jobs
The following jobs are commonly required, regardless of the integration single or multiple job approach.
1. Delta catalog export job
This job is responsible for exporting base and storefront delta data from Salesforce Commerce Cloud (SFCC) and delivering the XML files to the designated Comet drop location.
Comet-Delta-CatalogExport-catalog
- Step Job for Base Catalog
- Comet-Delta-CatalogExport-Base
- Configuration:
- Enter the base catalog ID that needs to be exported. Ex: electronics-catalog
- Consumer:
Comet - Export File:
Catalogs/Delta-Export/base1 - MasterProductExport flag is set to true.
- Configuration:
- Comet-Delta-CatalogExport-MoveTo-CometLocalDirCatBase : Moves the file into Comet local folder in SFCC.
- Configuration:
- Select the site for which the integration has been done.
- Comet-Full-CatalogExport-UploadToComet-Base
- Configuration:
- Comet-Delta-CatalogExport-UploadToComet-RemoteCatBase: Transfer the file to Comet remote location.
- Comet-Delta-CatalogExport-Base
- Step Job for Storefront Catalog
- Comet-Delta-CatalogExport-storefrontCatalog
- Configuration:
- Enter the base catalog ID that needs to be exported. Ex: storefront-catalog-en
- Consumer:
Comet - Export File:
Catalogs/Delta-Export/storefront - MasterProductExport flag is set to true.
- Configuration:
- Comet-Delta-CatalogExport-MoveTo-CometLocalDirCatBase : Moves the file into Comet local folder in SFCC.
- Configuration:
- Select the site for which the integration has been done.
- Comet-Full-CatalogExport-UploadToComet-Base
- Configuration:
- Comet-Delta-CatalogExport-UploadToComet-RemoteCatBase: Transfer the file to Comet remote location.
- Comet-Delta-CatalogExport-storefrontCatalog
2. Delta Price books export job
This job uses an out of the box delta job of SFCC. We need to create a delta job in SFCC for a delta price book because as of now SFCC doesnt have a import & export for delta jobs.
Important Note: while creating delta job for pricebook, please follow the following guidelines:
- Name: Name should consist of “Site-ID/PriceBooks” Ex: “RefArch/PriceBooks” OR “sitegenesis/PriceBooks”.
- Consumers: consumers always should be “Comet-Delta-Export”.
- Select the PriceBooks which are assigned to that site.
Please create a separate job for each site which you want to integrate with. Job schedule can be configured here, then press apply. Now, we will have to send this file to the Comet server. There are jobs in Administration > Operations > Jobs for this purpose.
- Comet-Delta-PriceBook-Export : Step Job for pricebook export
- Comet-Delta-PriceBook-Export-MoveTo-CometLocalDir : Moves the file into Comet local folder in SFCC.
- Configuration: Select the site for which the integration has been done.
- Comet-Delta-PriceBook-Export-UploadToComet-WebDav: Transfer the file to Comet remote location.
- Configuration: Select the site for which the integration has been done.
- Comet-Delta-PriceBook-Export-MoveTo-CometLocalDir : Moves the file into Comet local folder in SFCC.
3. Delta Inventory export job
This job uses an out of the box delta job of SFCC. You can create a delta job in SFCC for a delta inventory export separately.
Important Note: while creating delta job for Inventory, please follow the following guidelines:
- Name: Name should consist of “Site-ID/Inventory” Ex: “RefArch/Inventory” OR SiteGenesis/Inventory.
- Consumers: consumers always should be “Comet-Delta-Export”.
- Select the inventory/inventories which are assigned to that site. Please create a separate job for each site which you want to integrate with. Job schedule can be configured here, then press apply.
Now, we will have to send this file to the Comet server. There are jobs in Administration > Operations > Jobs for this purpose.
4. Delta Campaign and Promotion export job
This job uses an out of the box delta job of SFCC. You can create a delta job in SFCC for a delta Promotion export separately.
Important Note: while creating delta job for Inventory, please follow the following guidelines:
- Name: Name should consist of “Site-ID/Promotions Ex: “RefArch/Promotions OR SiteGenesis/Promotions.
- Consumers: consumers always should be “Comet-Delta-Export”.
- Select the Sites -> SiteGenesis -> Campaigns and Promotions from the checkbox. Please create a separate delta job for each site which you want to integrate with. Job schedule can be configured here, then press apply.
Now, we will have to send this file to the Comet server. There is a jobs in Administration > Operations > Jobs Comet-Delta-CampPromo-Export for this purpose. Please schedule it as per the need.
Services
Once a job has completed its execution, the bc_comet.http.notification.webhook service will be invoked. It will send a notification to the Comet backend, informing it about the job's completion status. If service fails then please contact Comet support (or email support@comet.rocks).
Tips
- To enable PayPal Express support
Go to SFCC's BM “Administration > Global Preferences > Feature Switches“ and enable “Enable Salesforce Commerce API Hook Execution“ checkout. Save the page.
Add the scopes at SLAS: SLAS link can be found on BM at “Administration > Site Development > Salesforce Commerce API Settings”:
- sfcc.shopper-baskets-orders
- sfcc.shopper-baskets-orders.rw
Go to Business Manager "Administration > Site Development > Open Commerce API Settings", select Shop API and Site. This section would already be there under the client ID, only update "put" method there.
{
  "resource_id": "/orders/*",
  "methods": ["get","patch", "put"],
  "read_attributes": "(**)",
  "write_attributes": "(**)"
}
- Setup Comet Specific Promotions
- Add the SCAPI scope “sfcc.shopper-context.rw“ of the SCAPI client ID from SLAS Admin UI.
- Go to Administration > Global Preferences > Feature Switches and enable “Enable Shopper Context“ option.
- After above steps, add the customer group “CometRocks“ to the Campaign (in Business Manager) which need to be run on the Comet Store.
Testing
The cartridge has been tested with Salesforce Commerce Cloud's Storefront Reference Architecture (SFRA) version 7.0 (Compatibility mode 24.3) and is compatible with versions down to 6.3 (Compatibility mode 22.7).
To test the functionality of the cartridge, follow these steps:
- Run any of the Comet Jobs.
- Wait for the Job execution to complete.
- Check the Job status:
- If the Job ends with status "OK":
- Login to the remote WebDAV server using a third-party WebDAV client application.
- Verify that the ZIP file containing the XML has been successfully uploaded to the WebDAV server.
- If the Job ends with status "ERROR":
- Check the custom log for specific error messages.
- Correct the configurations as indicated by the log error messages.
- If the Job ends with status "OK":
By following these testing instructions, you can ensure that the cartridge is functioning as expected and troubleshoot any issues that may arise during the process.!